Tutorial to develop a Spyder plugin#
This tutorial walks you through creating a Spyder plugin to add a configurable Pomodoro Technique timer to the status bar and toolbar buttons to interact with it. Along the way, we’ll learn how to use Spyder’s API to develop plugins and extend their functionality.
To do so, we’ll:
List the Prerequisites to implement a Spyder plugin.
Describe the Learning goals that a participant can achieve.
Explain the types of Spyder plugins and their benefits.
Define how to set up an environment for plugin development.
Go through the steps to build and publish a simple plugin.
Finally, highlight the key points of developing maintainable, adaptable plugins with Spyder.
Prerequisites#
You will need to have Spyder 5 installed. Visit our Install Guide for more information.
Important
Spyder offers Standalone installers for Windows, macOS and Linux, making it easier to get up and running with the application without having to download Anaconda or manually install it in your existing environment. However, for this tutorial Spyder should be installed using Anaconda or Miniconda, as standalone installers currently do not allow adding extra packages like the plugin we are going to develop.
It is also desirable to have the following prior knowledge:
Intermediate proficiency with Python. You can visit The Python Tutorial to learn the basics of this programming language.
Basics of Qt application development using Python, either with PyQt or PySide.
To quickly get started in desktop application development with Qt and Python, here is a set of open access resources:
Learning goals#
By the end of this tutorial, we’ll learn:
The basics of developing plugins for Spyder, and a general idea of its inner workings.
The types of plugins that can be developed for Spyder.
The structure of a plugin, the functionality of its components, and how to extend its features.
The way to package and publish a plugin so that it can be installed and used by others.
Spyder fundamentals#
Before we dive into the formal explanation of Spyder plugins, let’s briefly go over some Spyder basics. Spyder is a powerful scientific desktop application written in Python with features for data exploration, interactive execution, deep inspection, and graphical visualization. Spyder uses Qt for its GUI, through the PyQt or PySide Python bindings via the QtPy abstraction layer:
Qt is an open source, multiplatform toolkit for creating graphical user interfaces. It is a complete development framework that offers utilities for building applications and has extensions for networking, Bluetooth, charts, 3D rendering, and navigation, among others.
PyQt and PySide are two different Python bindings for the C++-native Qt library, allowing Spyder to use Qt from Python.
QtPy is an abstraction layer for PyQt and PySide, allowing Spyder to work with either one as well as multiple major Qt versions.
As for Spyder’s own structure, all of its panes and nearly all its functionality is implemented as plugins. This means the plugins you create can be just as powerful as Spyder’s own internal components!
To learn more about Spyder itself, check out the website and documentation, and to contribute, read the contributing guide!
Basic plugin concepts#
Now that we know a little bit about the basics of Spyder, let’s go over the basics of Spyder plugins.
First, let’s define what a plugin is.
A plugin is a component that adds functionality to an application; it can be a graphical component, for example, to display maps, or a non-graphical one that adds additional syntax highlighting schemes.
For Spyder, plugins add new panes, new features, or otherwise modify Spyder’s behavior.
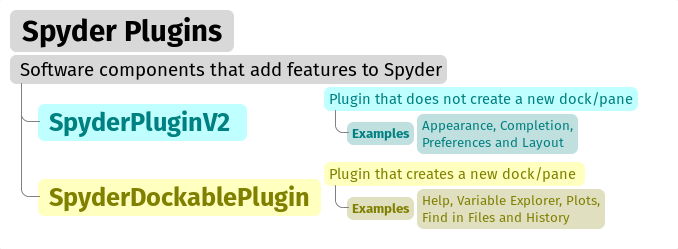
Aside from a few fundamental components, most of Spyder’s functionality is implemented via plugins of two types: SpyderDockablePlugin and SpyderPluginV2.
SpyderDockablePlugin#
A plugin with a dockable pane in the Spyder interface, implemented as a QDockWidget. This is a Qt class that provides a graphical widget that can be docked inside a QMainWindow or floated as a top-level window on the desktop.
SpyderPluginV2#
A plugin that does not create a new pane (QDockWidget) in Spyder’s main window.
In fact, SpyderPluginV2 is the parent class of SpyderDockablePlugin.
What will we do?#
So far, we have reviewed the concepts necessary to create your first plugin. In this section, we:
Explain the Pomodoro technique that will be implemented for time management in the plugin.
Describe the steps to develop the plugin.
Present the main features that will be displayed in Spyder once the plugin is developed and published.
Pomodoro Technique#
The Pomodoro Technique, designed by Francesco Cirillo, is a time management practice used to increase concentration and productivity when completing tasks or meeting deadlines. Using a Pomodoro timer can help you pay attention to a task.
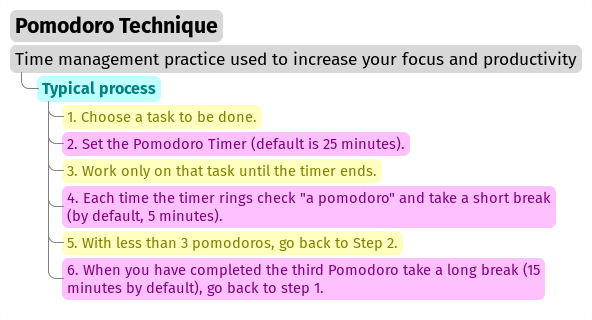
The typical process of the Pomodoro technique consists of the following six steps:
Choose a task to be done.
Set the Pomodoro timer (default is 25 minutes).
Work only on that task until the timer ends.
Put a check mark on a piece of paper when the timer rings; this is called a “pomodoro”.
If you have fewer than 3 check marks, take a short break (by default, 5 minutes), and go back to step 2.
When you have completed four Pomodoro cycles, you deserve a longer break (our default is 15 minutes). The check marks are reset to zero; return to step 1.
Steps to develop a plugin#
These are the general steps that we will follow throughout this tutorial:
Select the most suitable plugin type and create its initial structure using Cookiecutter.
Install the plugin in development mode in the virtual environment from which we run Spyder.
Implement the functionality of our plugin using the Spyder classes and following the guidelines indicated in the plugin structure.
Build a configuration page for our plugin (if needed), which will appear in .
Features#
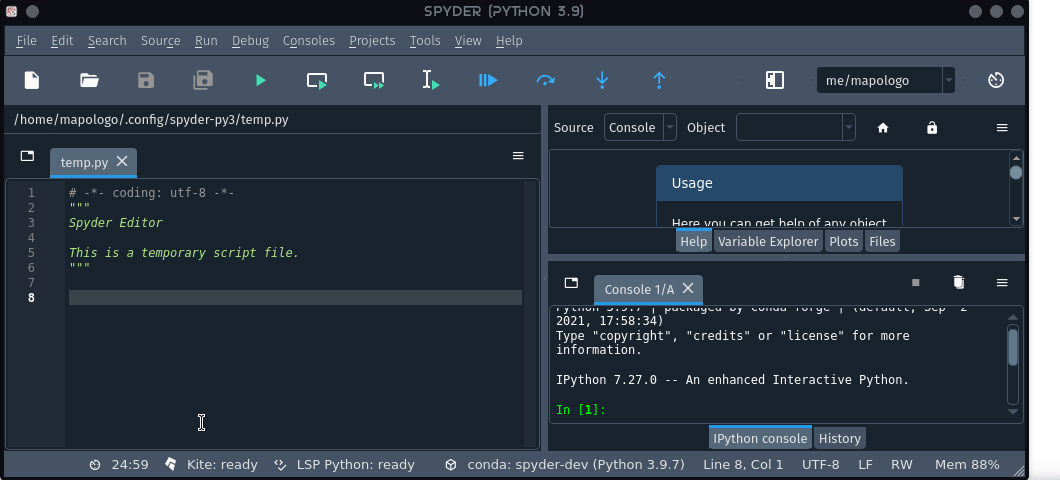
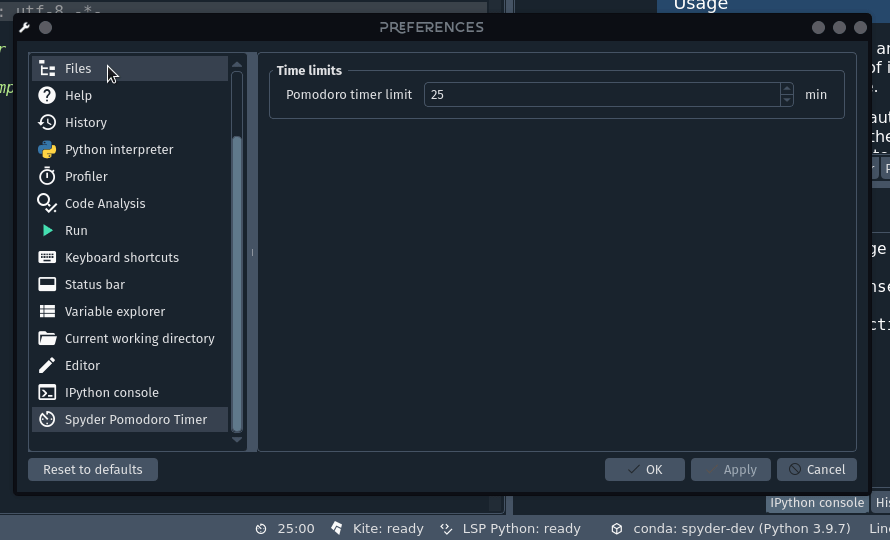
Up to this point, we’ve gone over the Pomodoro Technique and the steps to develop a Spyder plugin. Now, we identify the features that will be displayed in Spyder once the plugin is implemented. As Figure 1 and Figure 2 show, there will be features in the toolbar, status bar, and the preferences window. An explanation of each feature is provided below.
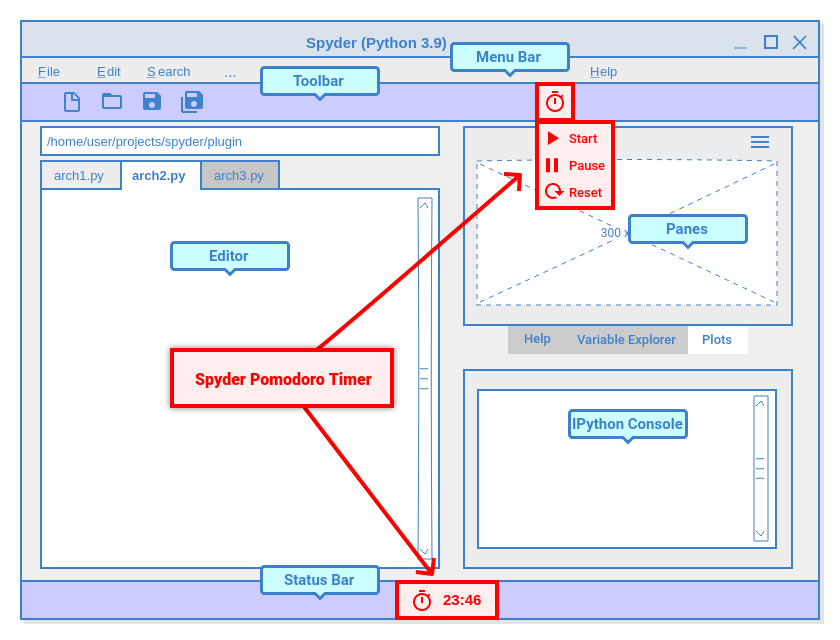
Figure 1: Location of Spyder Pomodoro Timer widgets in Spyder.#
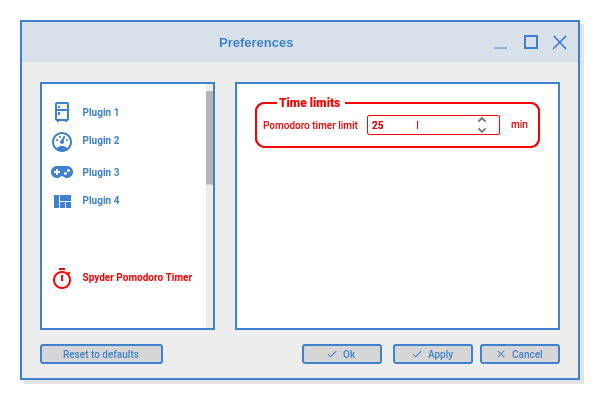
Figure 2: Spyder Pomodoro Timer in the preferences window.#
Pomodoro Timer
Status bar widget. Used to display the time of the current pomodoro interval.
State. We have three activity states:
pomodoro,short-breakandlong-break. We can show a message (with QMessageBox) to indicate to users that it is time to take a break.Interactions. The user can use Start, Stop and Reset buttons to operate the pomodoro timer. This could be implemented by adding instances of QAction in a toolbar menu.
Preferences. An option will be implemented in the preferences window to set the time limits of the pomodoro timer.
Tasks Logger
Counter. A variable is needed to count the number of completed pomodoros.
Notifications
Dialog. Each time a pomodoro or break interval is completed, a message should appear to tell the user to start working on a task or take a break.
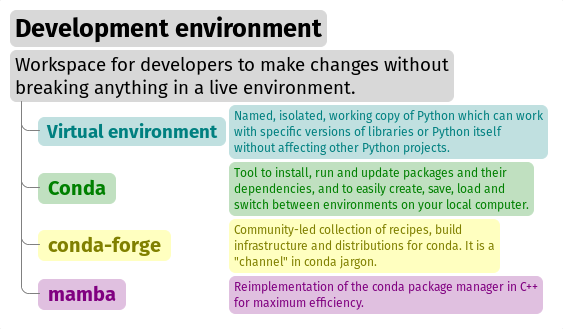
Development environment#
This section describes two main tasks for plugin development: Setting up the development environment and Creating a repository to manage code changes and versions.
Setting up the development environment#
In principle, we could use any copy of Spyder within a conda environment installed as described in the Install Guide. However, if you use a working environment that has other dependencies and you want to keep your plugin development independent of them, we recommend creating a new virtual environment that only has Spyder with the minimum dependencies needed for your plugin.
We can install it using the following system terminal commands (in the Anaconda Prompt, on Windows):
conda activate base
conda create -n spyder-dev -c conda-forge spyder
conda activate spyder-dev
Note
Miniforge is a Python distribution for data science and machine learning, similar to Anaconda except without all the glut of packages installed by default (which won’t be used here).
Conda is an open source tool that manages virtual environments and their packages.
Conda can work with channels that allow the use of packages that are not part of the official distribution. The most important channel is conda-forge, where a more extensive and updated list of packages is maintained than those offered by Anaconda itself.
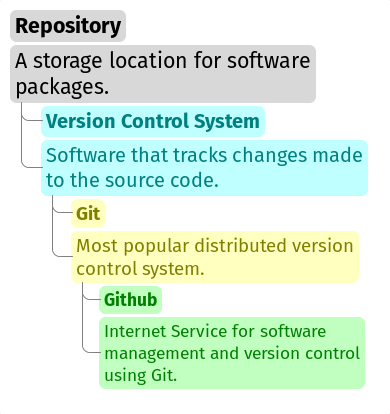
Creating a repository#
Now that we have our local virtual environment, it is good practice to manage our source code with a version control system.
By far the most widely used VCS is Git, and the most popular web hosting service for Git is GitHub.
You can find the Spyder repository on GitHub, and download (or clone) it with Git.
To create a Git repository on GitHub, we need to follow these steps:
Log in to your GitHub account (or create one if you don’t have one already).
Click on the New repository option in the + menu at the top right next to your profile picture.
Type the repository name in the resulting dialog and select the options you want (e.g. whether to initialize the repository with a README or license files).
Click the Create repository button.
In the main window of the newly created repository, click on the green Code button and copy the clone link.
On your local command line, run
git clone <repo-link>. You must have Git installed and configured on your computer. If you have no experience using Git, we recommend The Carpentries workshop Version Control with Git.
You can find a detailed description of creating repositories in the official GitHub documentation, and a Hello World tutorial with basic Git operations from the GitHub interface.
Defining the plugin structure#
We already have a Git repository and a virtual environment where Spyder 5 is installed. Let’s activate our environment in the system terminal (Anaconda Prompt for Windows) and navigate into the root folder of our repository:
conda activate spyder-dev
cd path/to/your/repository
Let’s run Cookiecutter to generate our plugin structure:
$ cookiecutter https://github.com/spyder-ide/spyder5-plugin-cookiecutter
full_name [Spyder Bot]: Spyder Man  # YOUR NAME
email [spyder.python@gmail.com]: spyder.python@gmail.com  # YOUR EMAIL
github_username [spyder-bot]: spyder-ide
github_org [spyder-ide]:
project_name [Spyder Boilerplate]: Spyder Pomodoro Timer
project_short_description [Boilerplate needed to create a Spyder Plugin.]: A very simple pomodoro timer that shows in the status bar.
project_pypi_name [spyder-pomodoro-timer]:
project_package_name [spyder_pomodoro_timer]:
pypi_username [spyder-ide]:
Select plugin_type:
1 - Spyder Dockable Plugin
2 - Spyder Plugin
Choose from 1, 2 [1]: 2
Select open_source_license:
1 - MIT license
2 - BSD license
3 - ISC license
4 - Apache Software License 2.0
5 - GNU General Public License v3
6 - Not open source
Choose from 1, 2, 3, 4, 5, 6 [1]: 1
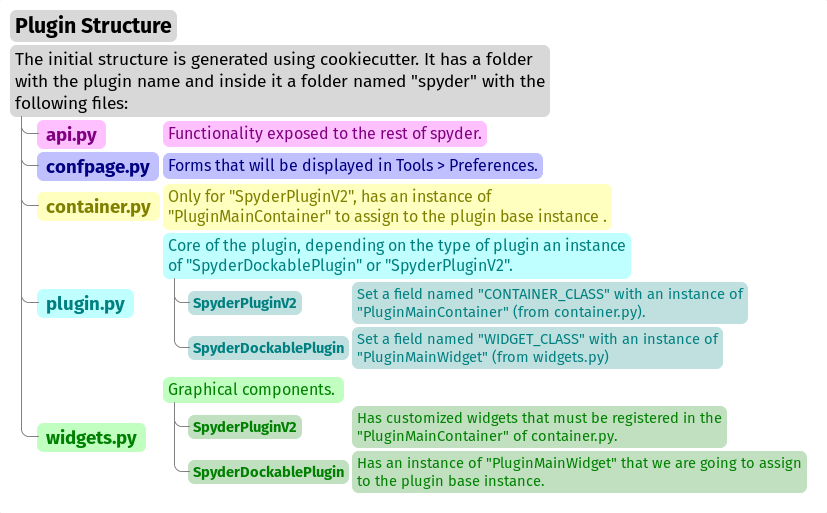
After cookicutter finishes its job, you’ll get the following tree structure in your repository:
.
├── [Some info files]
├── Makefile
├── setup.py
├── spyder_pomodoro_timer
│   ├── __init__.py
│   └── spyder
│       ├── __init__.py
│       ├── api.py
│       ├── confpage.py
│       ├── container.py
│       ├── locale
│       │   └── spyder_pomodoro_timer.pot
│       ├── plugin.py
│       └── widgets.py
└── tests
In the root folder you’ll find two important files:
The Makefile, which has several useful commands:
clean                remove all build, test, coverage and Python artifacts
clean-build          remove build artifacts
clean-pyc            remove Python file artifacts
clean-test           remove test and coverage artifacts
test                 run tests quickly with the default Python
docs                 generate Sphinx HTML documentation, including API docs
servedocs            compile the docs watching for changes
release              package and upload a release
dist                 builds source and wheel package
install              install the package to the active Python's site-packages
develop              install the package to the active Python's site-packages
setup.py. It helps you install, package and distribute your plugin with Setuptools, the standard for distributing Python packages. In this file theentry_pointsparameter ofsetupis quite important, as it is what allows Spyder to identify this package as a plugin, and know how to access its functionality.
The folder for spyder-pomodoro-timer has the project name you entered when you ran cookiecutter.
Inside it we should see a folder called spyder, where we will place the code of our plugin.
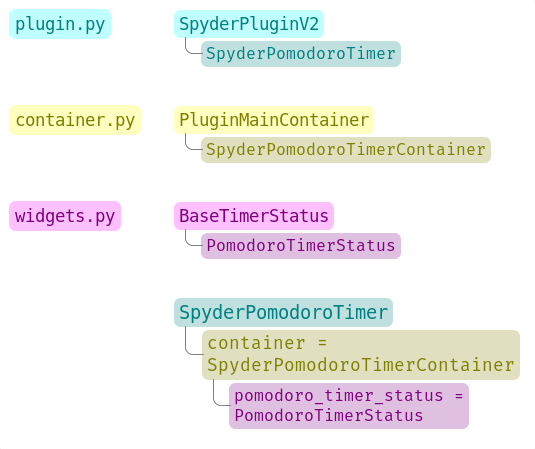
In the spyder directory you’ll find the following files:
api.py. Exposes the functionality of the plugin to the rest of Spyder, allowing other plugins to build on top of it in turn.plugin.py. This is the core of the plugin. Depending on the type of plugin created, you will see an instance of eitherSpyderDockablePluginorSpyderPluginV2.If it is a
SpyderPluginV2, it needs to have a constant namedCONTAINER_CLASSwith its value being a class object which is a subclass ofPluginMainContainer.If it is a
SpyderDockablePlugin, it needs constant namedWIDGET_CLASSwith its value being a class object which is a subclass ofPluginMainWidget.
For example, with a
SpyderPluginV2:# plugin.py from spyder.api.plugins import SpyderPluginV2 from my_plugin.spyder.container import MyContainer class MyPlugin(SpyderPluginV2): CONTAINER_CLASS = MyContainer
container.py. Only used forSpyderPluginV2plugins, this file has an instance ofPluginMainContainerthat contains references to all graphical elements (or widgets) your plugin will add to the interface. This is necessary because Qt requires widgets to be children of other widgets before using them (otherwise they appear as floating windows). SinceSpyderPluginV2is not a widget, the container (which is a widget) serves this role for us.widgets.py. Contains the graphical components of our plugin. This not needed for aSpyderPluginV2without widgets. ForSpyderPluginV2with widgets or aSpyderDockablePlugin, the required instance ofPluginMainWidgetgoes here.confpage.py. Includes the configuration page that will be displayed in Preferences, so that the user can adjust the options of our plugin.
Building our plugin#
We’ll now build the three components of our plugin step by step: its graphical widgets, the container for them, and the plugin interface itself.
The Spyder-Pomodoro-Timer repository contains all the major versions of the code we’ll walk you through, in case you run into any issues.
We’ll call the initial template (produced by the cookiecutter above) INITIAL.
The first working version we are building here we’ll refer to as HELLO WORLD.
Note
We will include links to the GitHub diffs between the tags at the end of each subsection, as an aid to check the progressive changes that we’ll make in the code.
The widgets#
The best way to start building our plugin is to implement its graphical components in the widgets.py file.
In INITIAL, the widgets.py file contains:
# Spyder imports
from spyder.api.config.decorators import on_conf_change
from spyder.api.translations import get_translation
from spyder.api.widgets.mixins import SpyderWidgetMixin

# Localization
_ = get_translation("spyder_pomodoro_timer.spyder")
The predetermined imports are a guide to what we will need in our plugin:
@on_conf_change(a decorator) propagates configuration changes.get_translation()generates and retrieves translation strings for the plugin.SpyderWidgetMixinadds the necessary attributes and methods to widgets to integrate it with Spyder (e.g. icon, style, translation, actions, and extra options).
Taking a look at the spyder.api.widgets.status module, there are two types of predefined widgets to go in the Spyder status bar:
StatusBarWidget. A class derived fromQWidgetandSpyderWidgetMixin, which contains an icon, a label, and a spinner (to show the plugin loading).BaseTimerStatus. A class derived fromStatusBarWidgetwith an internalQTimerto periodically update its content.
Since we want a widget that shows the Pomodoro countdown and is updated periodically, we will use an instance of BaseTimerStatus.
So, we can replace
from spyder.api.widgets.mixins import SpyderWidgetMixin
with
from spyder.api.widgets.status import BaseTimerStatus
from spyder.utils.icon_manager import ima
and add an initial import:
# Third party imports
import qtawesome as qta
With that, we can write our first widget like this:
class PomodoroTimerStatus(BaseTimerStatus):
    """Status bar widget to display the pomodoro timer."""

    ID = "pomodoro_timer_status"
    CONF_SECTION = "spyder_pomodoro_timer"

    def __init__(self, parent):
        super().__init__(parent)
        self.value = "25:00"

    def get_tooltip(self):
        """Override api method."""
        return "I am the Pomodoro timer!"

    def get_icon(self):
        return qta.icon("mdi.av-timer", color=ima.MAIN_FG_COLOR)
Note
Spyder needs an ID to be defined for BaseTimerStatus.
Its constructor calls the parent class constructor and initializes the label with value.
We’ve added a tooltip to explain the purpose of our widget, and an icon from QtAwesome (a Spyder project that makes it easy to incorporate icon fonts into PyQT applications).
We can find an appropriate icon by running the qta-browser command in a system terminal (Anaconda Prompt on Windows).
From here, as Figure 3 shows, we can select and copy the icon name of our preference.
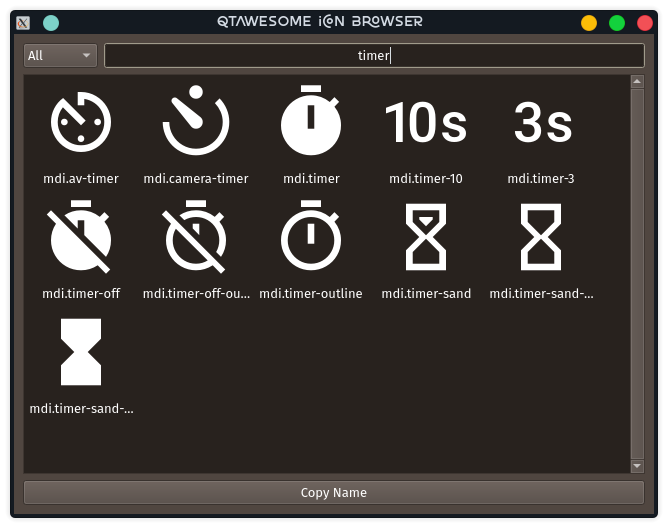
Figure 3: QtAwesome icon browser#
To finish the implementation of our widget, BaseTimerStatus requires the following method to update its contents each time it is requested by the internal timer:
# ---- BaseTimerStatus API
def get_value(self):
    """Get current time of the timer."""
    return self.value
Here’s the INITIAL -> HELLO WORLD widgets.py diff that sums everything up.
The container#
The next step is instantiating the status bar widget we created above.
To do this, we need a QWidget instance (the container) to be the parent of all the other widgets in our plugin (as explained in the discussion above).
The INITIAL version of the container.py file is:
from spyder.api.config.decorators import on_conf_change
from spyder.api.translations import get_translation
from spyder.api.widgets.main_container import PluginMainContainer

_ = get_translation("spyder_pomodoro_timer.spyder")

class SpyderPomodoroTimerContainer(PluginMainContainer):

    # Signals

    # --- PluginMainContainer API
    # ------------------------------------------------------------------------
    def setup(self):
        pass

    def update_actions(self):
        pass
SpyderPomodoroTimerContainer is already defined, and we just need to implement the setup() method.
This is where we add the widget we created earlier to the container.
To do so, first we need to import the widget:
# Local imports
from spyder_pomodoro_timer.spyder.widgets import PomodoroTimerStatus
Then, we edit the setup() method to add an instance of our widget.
def setup(self):
    # Widgets
    self.pomodoro_timer_status = PomodoroTimerStatus(self)
Here’s the full INITIAL -> HELLO WORLD container.py diff, as a review.
The plugin#
Finally, we define our plugin to be registered within Spyder.
The INITIAL version (i.e. the one created by our cookiecutter template) of the plugin.py file has a number of imports:
# Third-party imports
from qtpy.QtGui import QIcon

# Spyder imports
from spyder.api.plugins import Plugins, SpyderPluginV2
from spyder.api.translations import get_translation

# Local imports
from spyder_pomodoro_timer.spyder.confpage import SpyderPomodoroTimerConfigPage
from spyder_pomodoro_timer.spyder.container import SpyderPomodoroTimerContainer

_ = get_translation("spyder_pomodoro_timer.spyder")
and the main plugin class:
class SpyderPomodoroTimer(SpyderPluginV2):
    """Spyder Pomodoro Timer plugin."""

    NAME = "spyder_pomodoro_timer"
    REQUIRES = []
    OPTIONAL = []
    CONTAINER_CLASS = SpyderPomodoroTimerContainer
    CONF_SECTION = NAME
    CONF_WIDGET_CLASS = SpyderPomodoroTimerConfigPage

    # --- Signals

    # --- SpyderPluginV2 API
    # ------------------------------------------------------------------------
    def get_name(self):
        return _("Spyder Pomodoro Timer")

    def get_description(self):
        return _("A very simple Pomodoro timer")

    def get_icon(self):
        return QIcon()

    def on_initialize(self):
        container = self.get_container()
        print('SpyderPomodoroTimer initialized!')

    def check_compatibility(self):
        valid = True
        message = ""  # Note: Remember to use _("") to localize the string
        return valid, message

    def on_close(self, cancellable=True):
        return True
Note
The CONTAINER_CLASS constant is what registers the container class we implemented previously with the top-level plugin object.
Now, we need to declare the dependencies of our plugin by defining the REQUIRES class constant.
As we are going to add a status bar widget, we need the StatusBar plugin, as shown below.
REQUIRES = [Plugins.StatusBar]
Then, we need to set the icon for our plugin. For that, we replace
from qtpy.QtGui import QIcon
with
# Third-party imports
import qtawesome as qta

# Spyder imports
from spyder.utils.icon_manager import ima
and replace
def get_icon(self):
    return QIcon()
with
def get_icon(self):
    return qta.icon("mdi.av-timer", color=ima.MAIN_FG_COLOR)
We also need to add, under Spyder imports:
# Spyder imports
from spyder.api.plugin_registration.decorators import on_plugin_available
And add the following code after the on_initialize() method:
@on_plugin_available(plugin=Plugins.StatusBar)
def on_statusbar_available(self):
    statusbar = self.get_plugin(Plugins.StatusBar)
    if statusbar:
        statusbar.add_status_widget(self.pomodoro_timer_status)
Taking these changes into account, Spyder will recognize the presence of our plugin and identify that it adds a new widget to the status bar.
Finally, we add the following property accessor to our plugin class:
@property
def pomodoro_timer_status(self):
    container = self.get_container()
    return container.pomodoro_timer_status
This way, consumers of SpyderPomodoroTimer can easily read (but not write) pomodoro_timer_status as an attribute of the top-level plugin.
In summary, we implemented the following structure:
We created a widget, added it to a container. In the plugin, we accessed the instance of that widget and added it to the status bar.
To summarize, here’s the full diff, INITIAL -> HELLO WORLD plugin.py diff.
Testing our plugin#
Now it is time to see how our plugin looks in the Spyder interface.
In a system terminal (Anaconda Prompt on Windows), from the root folder of our plugin, we activate the plugin’s environment and install it:
conda activate spyder-dev
pip install -e .
Running Spyder in the system terminal and checking the output, we should see:
$ spyder
SpyderPomodoroTimer registered!
And as Figure 4 presents, you should see our plugin in the Spyder status bar with the tooltip I am the Pomodoro tooltip!

Figure 4: First “Hello World” version of our plugin in the status bar#
Hint
Every time we modify the code, we’ll need to restart Spyder to see the updates to our plugin.
Making the Pomodoro timer work#
Now, we’re going to get into the details of how Spyder plugins are implemented in Qt.
The plugin displays the time in Spyder’s status bar, but the Pomodoro timer is not being updated.
In this section, we will use a QTimer in the PomodoroTimerStatus class (inherited from BaseTimerStatus) to update the time shown in the status bar.
Hint
If you’re new to Qt, see our Qt Fundamentals page for an overview of the basics, and the Qt documentation for the full reference.
Let’s go back to widgets.py and add the default time and update interval below the import lines:
# --- Constants

# ------ Default time limits
POMODORO_DEFAULT = 25 * 60 * 1000  # 25 minutes in milliseconds
INTERVAL = 1000
POMODORO_DEFAULT sets the default Pomodoro time limit in milliseconds and INTERVAL is how often to update the timer (every second).
Now, in the __init__ method of the PomodoroTimerStatus class, we need to add:
# Current time limit
self.pomodoro_limit = POMODORO_DEFAULT
self.countdown = self.pomodoro_limit
self._interval = INTERVAL

self.timer.timeout.connect(self.update_timer)
self.timer.start(self._interval)
Here, we add the following attributes:
pomodoro_limit: The current Pomodoro time limit in ms, which we set to the default time specified by thePOMODORO_DEFAULTconstant.countdown: The number of milliseconds left in the countdown, which is set to the starting value ofself.pomodoro_limit._interval: The timer update frequency, to which we assign the value of theINTERVALconstant (1000 ms / 1 s).
Note
The leading underscore (_) in self._interval, signifies this attribute is private and not intended to be used outside the class.
After that, we set up the self.timer object, a QTimer which this class inherits from its parent BaseTimerStatus.
To do this, we use the connect method of self.timer.timeout, passing it a update_timer function as a callback.
Then, we call self.timer.start(), which calls update_timer at the time interval we pass it.
Now let’s implement the update_timer() callback method (at the end of widgets.py):
def display_time(self):
    """Calculate the time that should be displayed."""
    minutes = int((self.countdown / (1000 * 60)) % 60)
    seconds = int((self.countdown / 1000) % 60)
    return f"{minutes:02d}:{seconds:02d}"

def update_timer(self):
    """
    Update the timer and the current widget.
    Also update the task counter if a task is a set.
    """
    if self.countdown > 0:
        # Update the current timer by decreasing the current running time by one second
        self.countdown -= INTERVAL
        self.value = self.display_time()
The display_time() method converts the current countdown value into human-readable text, which the update_timer() callback uses to decrement the timer value every second until it reaches zero.
If we run Spyder again, we will see that our timer has started counting down.
For reference, the changes in this revision (”TIMER”) are shown in the HELLO WORLD -> TIMER widgets.py diff.
Adding timer controls to the toolbar#
Now that our plugin updates the timer in Spyder’s toolbar, we’ll add some controls for it, by:
Implementing these changes will help us learn how to work with toolbars, menus, and actions in Spyder.
For future reference, we’ll call this revision TOOLBAR.
Creating a toolbar subclass#
Focusing on widgets.py first, let’s import the Spyder ApplicationToolbar class:
from spyder.api.widgets.toolbars import ApplicationToolbar
Then, create our own subclass of it above the PomodoroTimerStatus class definition:
class PomodoroTimerToolbar(ApplicationToolbar):
    """Toolbar to add buttons to control our timer."""
    ID = 'pomodoro_timer_toolbar'
The only customization we need is to declare an ID to identify our particular toolbar.
Next, we need to declare a boolean variable in our status widget to indicate if the countdown is paused or not.
Let’s add the following code inside the __init__ method of the PomodoroTimerStatus class definition:
self.pause = True
And inside the update_timer method of the same class, replace
if self.countdown > 0:
with
if self.countdown > 0 and not self.pause:
Here’s a full listing of the TIMER -> TOOLBAR widgets.py diff.
Declaring the high-level toolbar structure#
Now we’ll declare the high-level structure of our new toolbar, including its actions and sections, as well as that of a menu for our plugin.
This goes in the api.py file, since that allows Spyder and other plugins to modify and add to our toolbar if needed.
Note
Actions represent the control buttons that have associated functions to be called when interacted with, while toolbar sections contain groups of actions.
Let’s add the following to api.py:
class PomodoroToolbarActions:
    Start = "start_timer"
    Pause = "pause_timer"
    Stop = "stop_timer'

class PomodoroToolbarSections:
    Controls = "pomodoro_timer"

class PomodoroMenuSections:
    Main = "main_section"
Here, we create three classes:
PomodoroToolbarActions: Lists the buttons in our toolbar—start, pause and stop the timerPomodoroToolbarSections: Lists the sections of the graphical toolbar—in this case, just one for the timer controlsPomodoroMenuSections: Lists the sections of a menu for the plugin (again, just one in this case)
Note
Lightweight class definitions with class constants facilitates the exchange of this information with minimal complexity.
To review, you can check out the TIMER -> TOOLBAR api.py diff.
Implementing the toolbar behaviors#
Now let’s implement the behavior of our new Pomodoro timer toolbar and its actions.
Because this involves the relationship between our plugin widgets, we’ll do this in the container.py file.
As we did with the PomodoroTimerStatus class, we will use QtAwesome icons for our actions.
We also use the QToolButton class for the buttons added to our toolbar.
We’ll first need to add these as third party imports (above the Spyder section):
# Third party imports
import qtawesome as qta
from qtpy.QtWidgets import QToolButton
At the end of the Spyder imports, we also need:
from spyder.utils.icon_manager import ima
We also need to add local imports from our widgets and api modules:
from spyder_pomodoro_timer.spyder.widgets import (
    PomodoroTimerStatus,
    PomodoroTimerToolbar,
)
from spyder_pomodoro_timer.spyder.api import (
    PomodoroToolbarActions,
    PomodoroToolbarSections,
    PomodoroMenuSections,
)
Next, we need to modify the setup method of the SpyderPomodoroTimerContainer class.
First, let’s instantiate the PomodoroTimerToolbar class that we declared previously:
title = _("Pomodoro Timer Toolbar")
self.pomodoro_timer_toolbar = PomodoroTimerToolbar(self, title)
Second, we create the actions corresponding to start, pause, and stop buttons on our toolbar:
start_timer_action = self.create_action(
    PomodoroToolbarActions.Start,
    text=_("Start"),
    tip=_("Start timer"),
    icon=qta.icon("fa.play-circle", color=ima.MAIN_FG_COLOR),
    triggered=self.start_pomodoro_timer,
)
pause_timer_action = self.create_action(
    PomodoroToolbarActions.Pause,
    text=_("Pause"),
    tip=_("Pause timer"),
    icon=qta.icon("fa.pause-circle", color=ima.MAIN_FG_COLOR),
    triggered=self.pause_pomodoro_timer,
)
stop_timer_action = self.create_action(
    PomodoroToolbarActions.Stop,
    text=_("Stop"),
    tip=_("Stop timer"),
    icon=qta.icon("fa.stop-circle", color=ima.MAIN_FG_COLOR),
    triggered=self.stop_pomodoro_timer,
)
We use the triggered parameter of create_action() to set the callback function that will be executed when the action is interacted with—in this case, when the corresponding toolbar buttons are clicked.
Third, we create a menu for our actions, and add them to it:
self.pomodoro_menu = self.create_menu(
    "pomodoro_timer_menu",
    text=_("Pomodoro timer"),
    icon=qta.icon("mdi.av-timer", color=ima.MAIN_FG_COLOR),
)
# Add actions to the menu
for action in [start_timer_action, pause_timer_action, stop_timer_action]:
    self.add_item_to_menu(
        action,
        self.pomodoro_menu,
        section=PomodoroMenuSections.Main,
    )
Fourth, let’s create a button to pop up the menu immediately when clicked, setting PopupMode to QToolButton.InstantPopup to achieve this:
self.pomodoro_button = self.create_toolbutton(
    "pomodoro_timer_button",
    text=_("Pomodoro timer"),
    icon=qta.icon("mdi.av-timer", color=ima.MAIN_FG_COLOR),
)
self.pomodoro_button.setMenu(self.pomodoro_menu)
self.pomodoro_button.setPopupMode(QToolButton.InstantPopup)
Fifth, we add the pomodoro_button menu popup to our toolbar:
self.add_item_to_toolbar(
    self.pomodoro_button,
    self.pomodoro_timer_toolbar,
    section=PomodoroToolbarSections.Controls,
)
Finally, we insert the appropriate public methods at the end of the SpyderPomodoroTimerContainer declaration (in the # --- Public API section).
def start_pomodoro_timer(self):
    """Start the timer."""
    self.pomodoro_timer_status.timer.start(1000)
    self.pomodoro_timer_status.pause = False

def pause_pomodoro_timer(self):
    """Pause the timer."""
    self.pomodoro_timer_status.timer.stop()
    self.pomodoro_timer_status.pause = True

def stop_pomodoro_timer(self):
    """Stop the timer."""
    self.pomodoro_timer_status.timer.stop()
    self.pomodoro_timer_status.pause = True
    self.pomodoro_timer_status.countdown = self.pomodoro_timer_status.pomodoro_limit
These methods set the pause attribute of pomodoro_timer_status,
and restart the countdown in the case of stop_pomodoro_timer().
Summing up, here’s the TIMER -> TOOLBAR container.py diff.
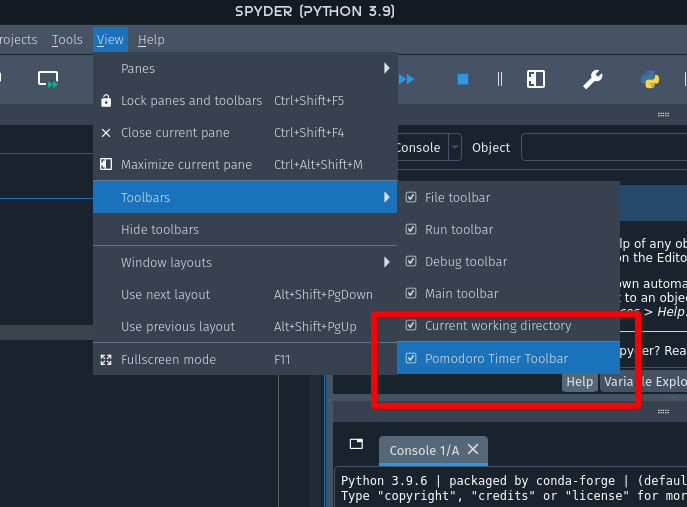
Registering the toolbar#
A final, mandatory step is to register the new pomodoro_timer_toolbar component in the plugin.py file.
To register, add Plugins.Toolbar to the plugin requirements:
REQUIRES = [Plugins.StatusBar, Plugins.Toolbar]
And use this plugin’s API to add the Pomodoro toolbar we created in the container module to the Spyder toolbar area.
@on_plugin_available(plugin=Plugins.Toolbar)
def on_toolbar_available(self):
    container = self.get_container()
    toolbar = self.get_plugin(Plugins.Toolbar)
    toolbar.add_application_toolbar(container.pomodoro_timer_toolbar)
Here’s the final TIMER -> ACTIONS plugin.py diff.
Reviewing our changes#
Once we’ve restarted Spyder, we should notice several new changes after our work above.
Our Pomodoro toolbar should be present, including its Start, Pause and Stop buttons.
In addition, the buttons should have the tooltips set by their corresponding tip parameter.
If we check the menu, there should be a new entry corresponding to our toolbar.
Finally, when we click the Pomodoro timer buttons on the toolbar, we should see the status bar widget changing accordingly.
Adding a configuration page#
Spyder plugins can have their own preferences section with configurable options listed in Spyder’s Preferences dialog. In this section, we’ll walk through implementing a preferences page for our example plugin.
We’ll call this final version of our plugin CONFPAGE, for reference in the diffs below.
_tutorial-config-defaults:
Defining the defaults#
The first step is to define what options we want to offer our users, which we’ll do in a new file named config.py.
In this file we’ll add some key constants and default config values:
"""Spyder-Pomodoro-Timer default configuration."""

# --- Constants

# ------ Time limits by default
POMODORO_DEFAULT = 25 * 60 * 1000  # 25 mins in milliseconds
CONF_SECTION = "spyder_pomodoro_timer"
CONF_DEFAULTS = [
    (
        CONF_SECTION,
        {
            "pomodoro_limit": POMODORO_DEFAULT / (60 * 1000),
        },
    ),
    ("shortcuts", {"pomodoro-timer start/pause": "Ctrl+Alt+Shift+P"}),
]
CONF_SECTION is the internal name of our plugin’s section in Preferences, as well as the plugin’s namespace in the config dictionary.
CONF_DEFAULTS lists the plugin’s settings and their default values.
In the code, we are indicating that pomodoro_limit is a configurable parameter within the spyder_pomodoro_timer section, and storing its default value in minutes for user display.
At the end of this file, as shown below, we need to set the CONF_VERSION constant.
It must be incremented when adding, deleting, or renaming configurable parameters in successive versions of the plugin.
# IMPORTANT NOTES:
# 1. If you want to *change* the default value of a current option, you need to
#    do a MINOR update in config version, e.g. from 1.0.0 to 1.1.0
# 2. If you want to *remove* options that are no longer needed in our codebase,
#    or if you want to *rename* options, then you need to do a MAJOR update in
#    version, e.g. from 1.0.0 to 2.0.0
# 3. You don't need to touch this value if you're just adding a new option
CONF_VERSION = "1.0.0"
Note
We’ve also moved the definition of POMODORO_DEFAULT from widgets.py to config.py, as we now have a dedicated place for default configuration values.
For reference, here’s the ACTIONS -> CONFPAGE config.py diff.
Building the preferences page#
Now, we need to create the preferences page itself.
To implement the required code, we will edit the generated confpage.py file as follows:
"""Spyder Pomodoro Timer Preferences Page."""

from qtpy.QtWidgets import QGridLayout, QGroupBox, QVBoxLayout
from spyder.api.preferences import PluginConfigPage
from spyder.api.translations import get_translation

from spyder_pomodoro_timer.spyder.config import POMODORO_DEFAULT

_ = get_translation("spyder_pomodoro_timer.spyder")

class SpyderPomodoroTimerConfigPage(PluginConfigPage):

    # --- PluginConfigPage API
    def setup_page(self):
        limits_group = QGroupBox(_("Time limits"))
        pomodoro_spin = self.create_spinbox(
            _("Pomodoro timer limit"),
            _("min"),
            "pomodoro_limit",
            default=POMODORO_DEFAULT,
            min_=5,
            max_=100,
            step=1,
        )

        pt_limits_layout = QGridLayout()
        pt_limits_layout.addWidget(pomodoro_spin.plabel, 0, 0)
        pt_limits_layout.addWidget(pomodoro_spin.spinbox, 0, 1)
        pt_limits_layout.addWidget(pomodoro_spin.slabel, 0, 2)
        pt_limits_layout.setColumnStretch(1, 100)
        limits_group.setLayout(pt_limits_layout)

        vlayout = QVBoxLayout()
        vlayout.addWidget(limits_group)
        vlayout.addStretch(1)
        self.setLayout(vlayout)
Most of this code follows the typical pattern of building up a Qt widget-based user interface.
In this case, our options section uses a QGroupBox, where the parameters are organized vertically using a QVBoxLayout.
Each parameter corresponds to a QGridLayout where labels and inputs (in this case a QSpinBox) are distributed.
Tip
Configuration pages in Spyder provide some helper methods to facilitate this work.
For instance, the create_spinbox() method allows us to instantiate and initialize the widgets corresponding to the prefix and suffix labels together with the spinbox, all in a single step.
You can see the all the changes we’ve made here in the ACTIONS -> CONFPAGE confpage.py diff.
Propagating config changes#
Since we moved all our configuration to config.py, we now have to import it into widgets.py:
# Local imports
from spyder_pomodoro_timer.spyder.config import (
    CONF_SECTION,
    CONF_DEFAULTS,
    CONF_VERSION,
)
In the class PomodoroTimerStatus, after the ID declaration, let’s add the config parameters as class constants:
CONF_SECTION = CONF_SECTION
CONF_DEFAULTS = CONF_DEFAULTS
CONF_VERSION = CONF_VERSION
We can now access the configuration options from anywhere in our plugin using the get_conf method.
In this case, we use this method to access the pomodoro_limit value of the configuration instead of just the POMODORO_DEFAULT constant, so we use the current user-selected value if configured:
self.pomodoro_limit = self.get_conf(
    "pomodoro_limit"
)
Then, we can add the set_pomodoro_limit() method that updates our configurable parameter pomodoro_limit.
@on_conf_change(option="pomodoro_limit")
def set_pomodoro_limit(self, value):
    self.pomodoro_limit = int(value) * 1000 * 60
    self.countdown = self.pomodoro_limit
    self.value = self.display_time()
Note
The @on_conf_change decorator is responsible for capturing the signal generated when changing a specific config option.
To view all these changes together, see the ACTIONS -> CONFPAGE widgets.py diff.
Registering preferences#
Finally, we need to enable using our new preference page in plugin.py, by including Plugin.Preferences in the list of REQUIRES:
class SpyderPomodoroTimer(SpyderPluginV2):
    ...
    REQUIRES = [Plugins.Preferences, Plugins.StatusBar, Plugins.Toolbar]
…and registering our plugin’s preferences in the on_preferences_available() method, which is decorated with @on_plugin_available so it is called once the Preferences plugin is loaded:
@on_plugin_available(plugin=Plugins.Preferences)
def on_preferences_available(self):
    preferences = self.get_plugin(Plugins.Preferences)
    preferences.register_plugin_preferences(self)
You can find the Spyder Preferences dialog in , or on macOS. As shown in the following image, we should find a section called Spyder Pomodoro Timer, which contains our Pomodoro timer limit parameter. If we modify that value, we should see how the corresponding status bar timer updates appropriately.
Now our example plugin is ready to be published!
For a review of our changes here, see the ACTIONS -> CONFPAGE plugin.py diff.
Publishing our plugin#
It’s time to publish our plugin as a PyPI package! PyPI, the Python Package Index, is the central repository where anyone can publish their own Python packages, that can be installed with Pip or other similar tools.
Note
Since the recommended way to install Spyder plugins is through Conda-Forge, its a good idea to also publish our plugin there.
Once our package is uploaded to PyPI, the Grayskull tool can automatically generate a Conda-Forge “recipe” with just a single command.
This can be added to Conda-Forge by cloning the Staged Recipes repo, adding the generated recipe to the recipes/ directory, and submitting a PR with your changes.
See the Conda-Forge Contributing Packages documentation for full details.
Creating a PyPI account#
First, we create an account on the PyPI and TestPyPI websites if we don’t have one already, by clicking Register in the top left and entering the appropriate details. Although our package will eventually be published on PyPI, it is advisable to use TestPyPI first to test that everything works correctly before actually uploading to the real thing, as once package versions are pushed to PyPI they cannot be changed.
Next, we should fill in the setup.py file at the root of our project with our package’s metadata.
Finally, in order to build and upload our package to PyPI, we need the Build builder frontend and Twine uploader. We can install them in our Conda environment using:
conda install -c conda-forge python-build twine
Caution
The Python build package is named build on PyPI (pip install build) and python-build on Conda-Forge (conda install python-build); the Conda-Forge package named build should not be used as it is obsolete.
Building and checking the package#
Before publishing our plugin, we must package it.
To do this, we execute the following code from the root folder of our project (where setup.py is located):
python -m build
Then, we can see that the following files are generated in the new dist folder:
spyder_pomodoro_timer
└── dist
    ├── spyder_pomodoro_timer-0.0.1.dev0-py3-none-any.whl
    └── spyder-pomodoro-timer-0.0.1.dev0.tar.gz
We can check that newly created distribution packages contain the expected files by inspecting the contents of the tar file (on Windows, you’ll need a third-party tool like 7-Zip to open it):
tar tzf dist/spyder-pomodoro-timer-0.0.1.dev0.tar.gz
You can also use Twine to run a check of the distribution packages created in the dist folder:
$ twine check dist/*
Checking dist/spyder_pomodoro_timer-0.0.1.dev0-py3-none-any.whl: PASSED
Checking dist/spyder-pomodoro-timer-0.0.1.dev0.tar.gz: PASSED
Testing and uploading to PyPI#
Now we can use twine to upload the distribution packages we have built.
First, we will upload them to TestPyPI to make sure everything works:
twine upload --repository-url https://test.pypi.org/legacy/ dist/*
This command will prompt you for the user name and password with which you registered in TestPyPI.
To view the uploaded package, open the Spyder-Pomodoro-Timer TestPyPI page.
We should notice that some details are missing, such as the package description.
Also, our package is marked as Development Status 5-Stable, which is not (yet) the case.
To fix the package description, we can follow the instructions in Making a PyPI-friendly README.
Since we already have a README.md file, we simply add the following lines to the beginning of setup.py:
# Read the contents of your README file
from pathlib import Path
this_directory = Path(__file__).parent
long_description = (this_directory / "README.md").read_text()

setup(
    name="spyder-pomodoro-timer",
    # ...
    long_description=long_description,
    long_description_content_type='text/markdown'
)
We can also add or change the classifiers of our package using the PyPI classifiers page as a guide.
We can copy the classifiers we consider appropriate and paste them as a list into the classifiers argument of setup().
After these changes and bumping the version of our plugin in the __init__.py inside the spyder_pomodoro_timer folder, we can repeat the cycle of building a new version of our package with build and uploading it to TestPyPI with twine.
After checking to make sure the result on TestPyPI looks as we expect, we can reset our package version to the initial 0.1.0 and finally upload it to PyPI with:
twine upload dist/
We can check the result in at our Spyder-Pomodoro-Timer PyPI page. Once this is done, anyone can install our plugin in their environments simply by running:
pip install spyder-pomodoro-timer
Final words#
Through this tutorial, we have navigated many of the features that Spyder offers for developing plugins. In Spyder, we have put a lot of effort toward creating and maintaining an API that allows for powerful, flexible and easy plugin development. The main focus of the development effort between versions 4 and 5 was in this direction, while Spyder 6 further expanded upon this work, so we’re looking forward to seeing what you can do with it!
In this tutorial, we’ve learned how to:
Understand the basic building blocks of Spyder development.
Choose the different types of plugins that can be implemented in Spyder.
Plan the development of a new Spyder plugin.
Set up a Spyder plugin development environment.
Initialize a Git repository on GitHub to manage our version control.
Generate the basic structure of a plugin using Cookiecutter.
Understand the basic file structure of a Spyder plugin.
Create, develop and test a plugin with Spyder.
Add and register Qt widgets in both the Spyder status bar and the toolbar.
Include a menu with multiple actions in the toolbar.
Add configuration options to a plugin and make them appear in the Preferences dialog.
Edit the packaging configuration of our plugin.
Publish our plugin on TestPyPI and PyPI.
We hope these skills have helped you learn how to develop your very own Spyder plugins!
Note
As you may have noticed, there were some features left to implement such as notifications when pomodoros are completed. Try to implement them by putting your knowledge in practice! Please, do not hesitate to contact us if you have any questions.
If you have any ideas for plugin development, you’re welcome to contact us through the Spyder-IDE GitHub organization.
Further reading#
If you would like to dive deeper into Spyder plugin development, we invite you to consult the following resources:
You can find additional examples in the plugin-examples repository that should be useful to better understand Spyder plugin development.
A closer look at the Spyder repository itself, especially its simpler plugins (such as History, Plots or Working directory) can help you understand Spyder better.
You can review the various helper functions, widgets and mixins present in spyder.api.